Testing Painting Techniques - Grisaille Underpainting
What on earth is grisaille underpainting?
Grisaille is the process of painting in shades of grey, effectively producing a monochrome image. And underpainting is the process of doing your lights and shadows before your base coats, most commonly doing a zenithal highlight, then painting over with translucent layers. Thus negating needing to do shades and highlights on your colours.
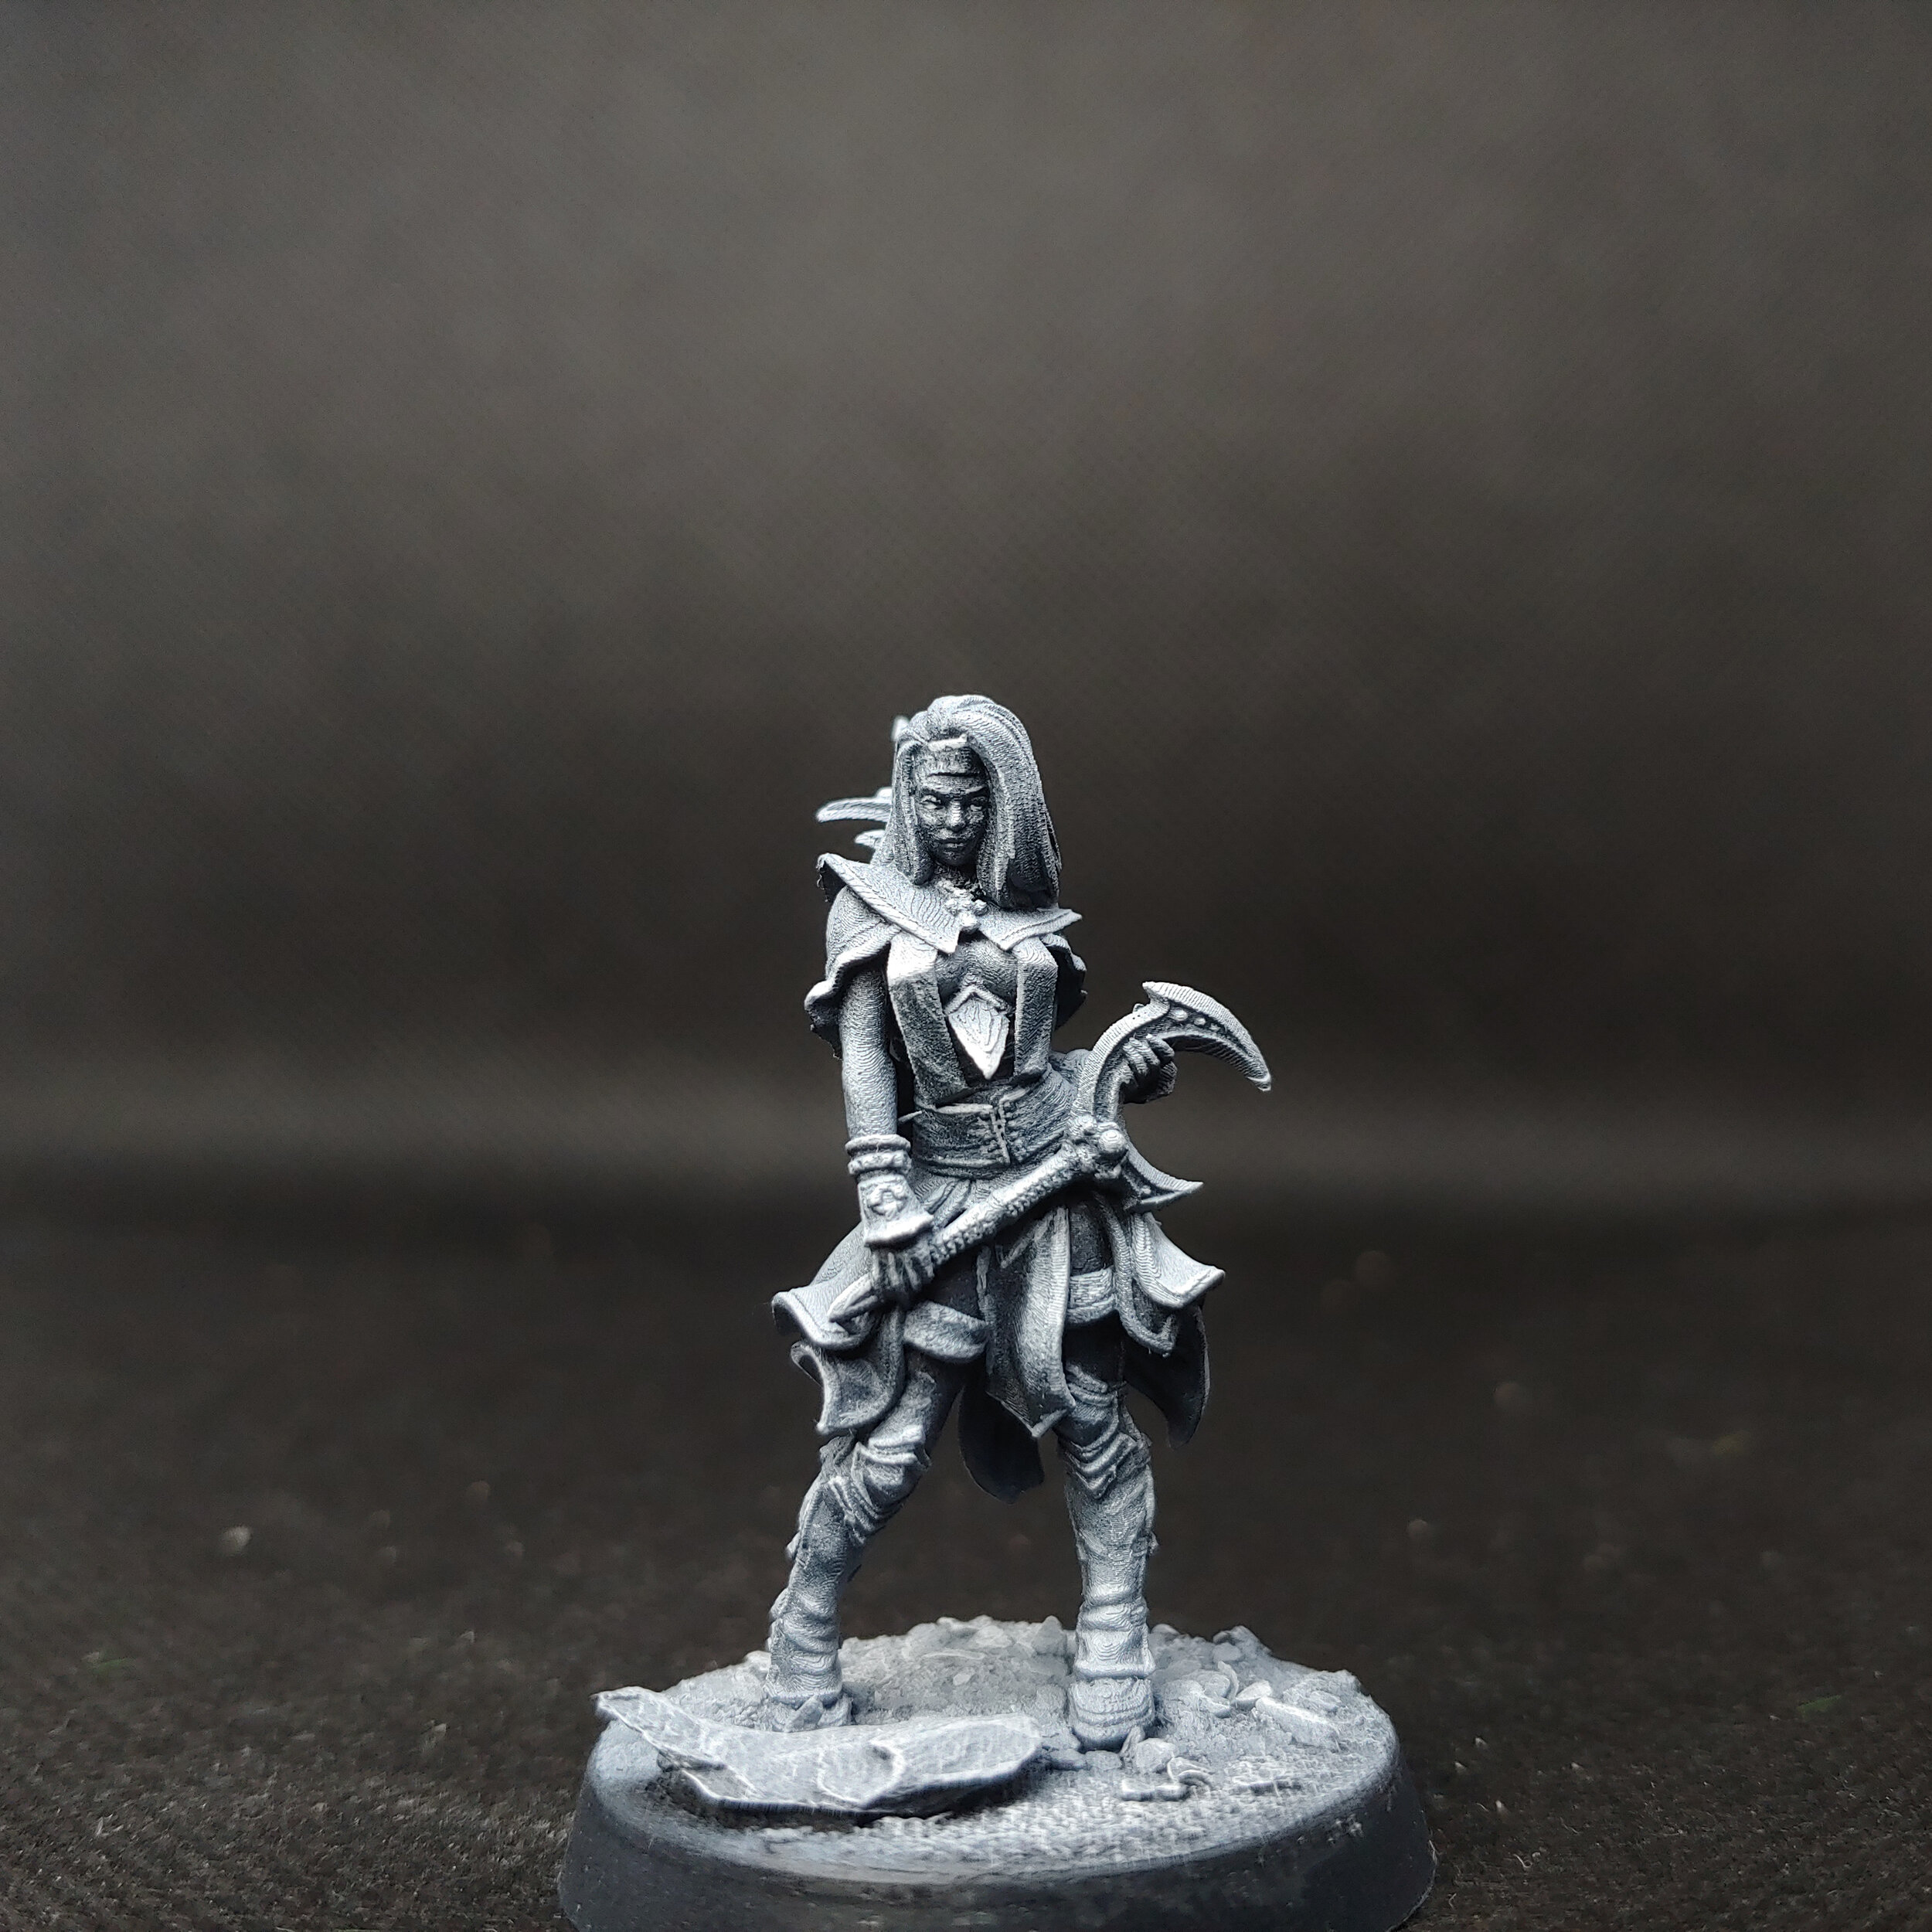
The completed underpainting
This process is certainly nothing new in the world of miniature painting, I personally got the idea from one of Marco Frisoni’s videos. It looked like fun and as I had a spare miniature from my mystery box from WePrintMiniatures and a bunch of contrast paints, it seemed like a perfect opportunity to give it a test. This particular model is apparently Silent Sister Mary, who has a sword stuck through her. Why? Who knows. In any case she has a bunch of billowing robes that would be fun to paint. So I cleaned up the print and stuck her to a base, slathered on some texture paint and added some rocks. I primed the model black and gave it a heavy zenithal highlight. Next I broke out the wet palette, some Army Painter Matt White and my finest brush; a Kolinsky Sable Zero. I glazed some highlights on the flesh that the zenithal might have missed or not reached, then I put edge highlights on the clothes and weapons. For the folds in the cloth I highlighted the raised areas with a series of cross-hatches to give the illusion of texture, you know like how people who can actually paint do. Finally, I drybrushed the base and rocks because there was no way I was going to do them individually. Overall, the process took me a couple of hours to complete and I feel that I learned quite a bit.

The brush strokes used to create that cloth texture effect.
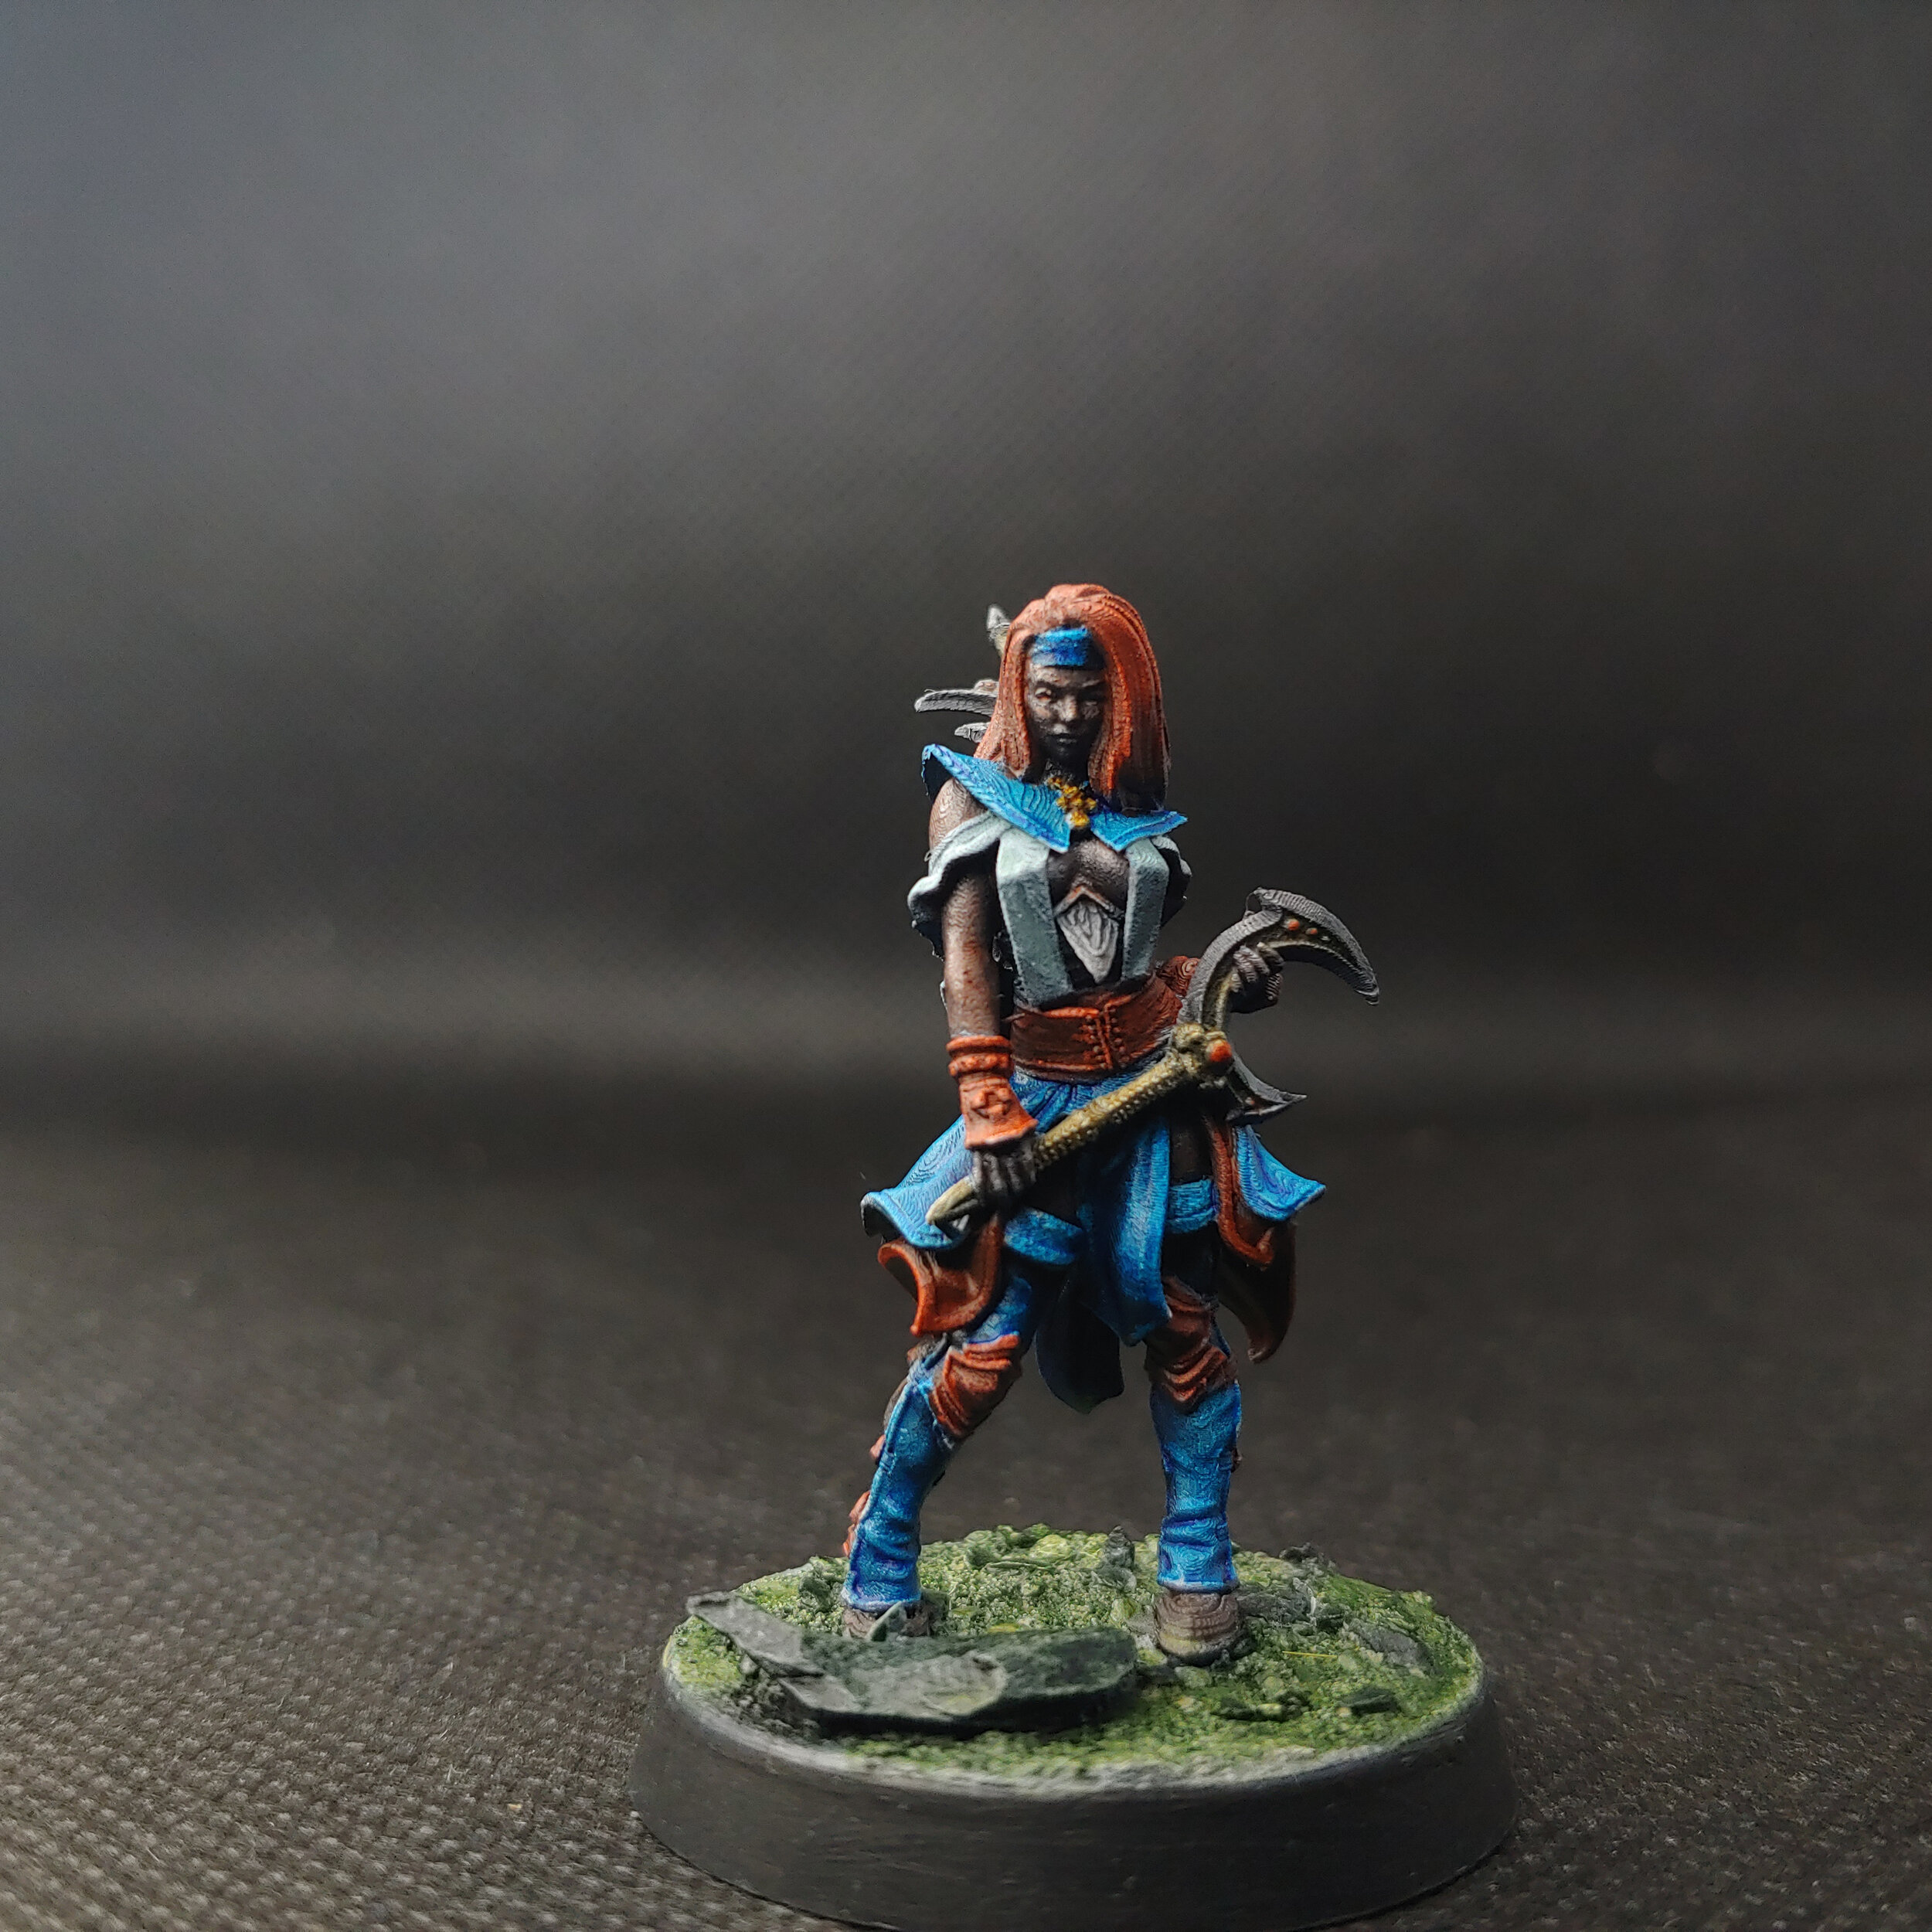
And with that, it was finally time to put some colour on the model. I don’t mind admitting that I was more than a little nervous, there was no going back after this. However, even before putting paint to model I had to decide on a colour scheme. I knew I wanted to use Citadel’s Contrast paint line to really take advantage of their transparency but my collection is mostly browns and I really wanted some big colours to jump off the miniature after spending so much time working in greyscale. One colour I did have was Talassar Blue which is absolutely packed with colour, I often use it for plasma coils and I used it for a Massive Darkness Low Troll monster way back when. Additionally, I had some Scale 75 Instant Colour Ancestral Blue that might work as an off colour, and I’ve been looking for an excuse to test it out. From what I had heard about the Instant Colour line, they are comparable to Citadel Contrast paints but nowhere near as saturated, taking a couple of coats to get a similar effect. For a secondary colour, I was tempted by Blood Angels Red but settled on Gryph-Hound Orange because it would contrast (pun fully intended) nicely with the blue. Afterall, orange and blue are on opposite sides of the colour wheel so they would make each other stand out. That’s probably why we had that brief period a few years ago in which practically every film poster was primarily blue and orange. Truly the darkest timeline. With my colour scheme mostly sorted in my head it was finally time to put some colour on Silent Sister Mary and I started with the skin as that was the deepest part of the model. I only have two flesh colours: Citadel Guilliman Flesh and Scale 75 Zombie Skin. The latter was fairly tempting given that Mary has a sword through her chest but I felt the green would clash with the blue. Plus, Mary seems pretty chill with said sword so who was I to judge?

Regardless, starting with the deepest parts of the miniature and moving outwards I carefully applied my contrast paints in even layers. For the most part I kept to my three main colours; Talassar Blue, Ancestral Blue and Gryph-Hound Orange for the clothes and hair. However, for the sword and the edge of Mary’s weapon I used Basilicanum Grey, for her necklace I used Snakebite Leather, for the weapon handles I used Skeleton Horde and for her boots I used Wyldwood. For the base, I didn’t want to use a brown as I felt that would be too dark. Zombie Skin however turned out to be the perfect muted green, it coloured the base without drawing attention from the miniature. For the rocks I picked them out with Black Templar, which in hindsight was a mistake as they then stood out like a sore thumb from the rest of the base. Thankfully, I had some Creed Camo that was able to darken the base down. This is pretty much the reason I was using these mystery box miniatures; I could experiment and make mistakes, and not sweat about it. The very last thing I needed to do was to tidy up the rim of the base with some pure black paint.
Overall, I’m really pleased with how this turned out, it was a real learning experience. I felt I gained some brush skills doing all that highlighting, especially with regards to finding the right paint consistency. There is a very fine line between paint that easily flows off the brush and paint that’s so thin it has a mind of its own. But this was a fun experiment, I certainly enjoyed it more than doing non-metallic metal. Next time I try this I will have to remember to really go to town brightening any skin areas, for this model I left a lot of them dark so when I put Guilliman Flesh over the top the resulting skin tone was more red than pink.
Also, while writing this article I found out some more about Silent Sister Mary. She is from the Tiger Skull RPG, a dark fantasy game inspired by eighties sword and sorcery. Specifically, Silent Sister Mary is a shackled spirit and former cleric, which I guess explains why she is nonplussed about the sword. Although it doesn’t explain how it came to be skewered through her chest...